A couple days ago I received my second Raspberry Pi. Since I had already tinkered with the configuration and installation of additional software packages I wanted to clone what I have to a new SD card and use this for my second Pi.
The only problem: The SD card I wanted to use for the second Pi is 16GB. The SD card in use by the first Pi is 32GB. In general this should not be a problem since I barely use 5GB from the available 32GB. Anyway, the question was: How do I get the system on the other Pi?
One way (which I did not try) could have been to simply create the necessary partitions on the new card, copy the contents from the 32GB card one partition at a time to the other SD card and enjoy the new system.
Frankly, I feel more comfortable with having one file that I just burn to the destination card without caring about partitions, files and whatever else.
So, how do I get an image of a SD card that I can then use to create a clone? The next tool at hand to go with is dd.
But dd is meant to do raw a copy, sector by sector, bit by bit! This would even be easier than before since I would just
have to push everything from the source SD card into a file and then push this image file to a destination SD card. The
only condition with this approach is: The destination card must be of the same or greater size than the source card! But
in my the destination card is smaller than the source.
To work around this I could have used gparted to first shrink the partitions of the 32G SD card, run dd and then cut
from the resulting image what I do not need. Again, I do not feel comfortable with altering the source just for the
purpose of cloning or creating an economical copy. But, there are some steps in this example that are useful for the
final solution.
The solution!
The solution that I finally put into practice is the following:
- use
ddto clone the source SD card into a file - use
resize2fsto shrink the filesystem as much as possible - use
fdiskto resize (delete and create) the system partition - use
truncateto cut of trailing waste from the image file and effectively making it smaller
Setup
In my case I have a SD card reader that is merely a USB Stick for SD and micro SD cards. So, I took the SD card from my first Pi, put it in the USB stick and plugged it into the system. To find out which device I have to use for dd I use lsblk. This is what it looked like before I plugged in the USB stick:
 NAME          MAJ:MIN RM   SIZE RO TYPE MOUNTPOINT
sda             8:0    0   128G  0 disk
├─sda1          8:1    0   250M  0 part /boot
├─sda2          8:2    0     1K  0 part
└─sda5          8:5    0 127.8G  0 part
  ├─root-swap 254:0    0     4G  0 lvm  [SWAP]
  └─root-root 254:1    0 123.8G  0 lvm  /
sdb             8:16   0    80G  0 disk
├─sdb1          8:17   0     1K  0 part
└─sdb5          8:21   0    80G  0 part
sr0            11:0    1  1024M  0 rom
And here is what it looks like after I plugged in the USB stick:
NAME          MAJ:MIN RM   SIZE RO TYPE MOUNTPOINT
sda             8:0    0   128G  0 disk
├─sda1          8:1    0   250M  0 part /boot
├─sda2          8:2    0     1K  0 part
└─sda5          8:5    0 127.8G  0 part
  ├─root-swap 254:0    0     4G  0 lvm  [SWAP]
  └─root-root 254:1    0 123.8G  0 lvm  /
sdb             8:16   0    80G  0 disk
├─sdb1          8:17   0     1K  0 part
└─sdb5          8:21   0    80G  0 part
sdc             8:32   1  29.7G  0 disk
├─sdc1          8:33   1    63M  0 part /media/marcel/boot
└─sdc2          8:34   1  29.7G  0 part /media/marcel/2f840c69-cecb-4b10-87e4-01b9d28c231c
sr0            11:0    1  1024M  0 rom
From this you can see, that there is a new device sdc with two partitions mounted at /media/marcel.
Clone a SD card with dd
Cloning the SD card is fairly easy with dd. But before I clone the SD card I will unmount the two partitions sdc1 and
sdc1 to make sure nothing is blocked. After all, I do not need them mounted anyway!
sudo umount /media/marcel/boot
sudo umount /media/marcel/2f840c69-cecb-4b10-87e4-01b9d28c231c
Now, I can clone the SD card with:
sudo dd status=progress if=/dev/sdc of=~/pi_backup.img
After some time I get a file ~/pi_backup.img with a size of about 30G. Here is what it looks like in the console when
this command finished on my system:
62333952+0 records in
62333952+0 records out
31914983424 bytes (32 GB, 30 GiB) copied, 1172.61 s, 27.2 MB/s
To verify all went well I compare the source with the destination:
sudo fdisk -l /dev/sdc
This shows me:
Units: sectors of 1 * 512 = 512 bytes
Sector size (logical/physical): 512 bytes / 512 bytes
I/O size (minimum/optimal): 512 bytes / 512 bytes
Disklabel type: dos
Disk identifier: 0x7b919980

Device     Boot  Start      End  Sectors  Size Id Type
/dev/sdc1         8192   137215   129024   63M  c W95 FAT32 (LBA)
/dev/sdc2       137216 62333951 62196736 29.7G 83 Linux
Next I run:
file -s ~/pi_backup.img
Which shows me:
/home/marcel/pi_backup.img: DOS/MBR boot sector; partition 1 : ID=0xc, start-CHS (0x0,130,3), end-CHS (0x8,138,2), startsector 8192, 129024 sectors; partition 2 : ID=0x83, start-CHS (0x60,0,1), end-CHS (0x8f,3,16), startsector 137216, 62196736 sectors
From this I am able to see that on the physical source I have two partitions. One starting at sector 8192, ending at sector 129024, being 129024 sectors in size and of type FAT32. A second partition starting at sector 137216, ending at sector 62333951, being 62196736 in size and of type Linux.
Comparing this to the output from file -s ~/pi_backup.img I can confirm, that start, end, size and type are all the
same. Perfect, this clone is identical!
To be on the safe side I unmounted and removed the USB stick with the source SD card.
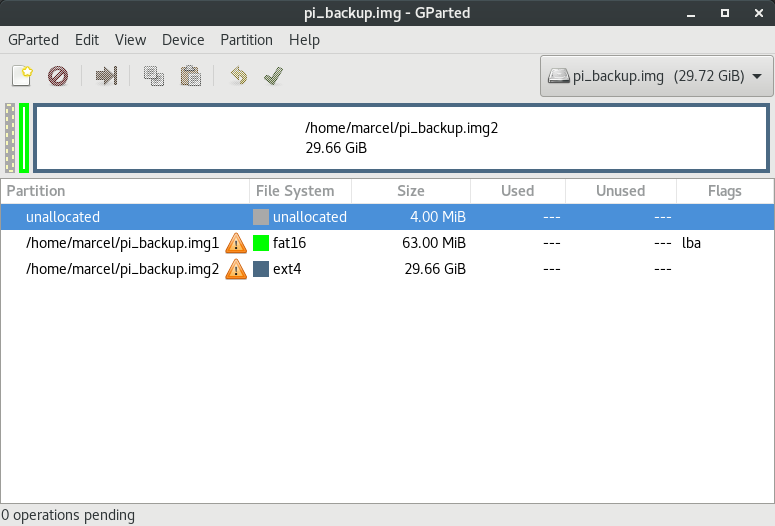
To visialize what we have so far, here is a screen shot of what it looks like in GParted.

Shrinking the filesystem
The next step is to shrink the filesystem. For this I first mount the image file with kpartx like this:
kpartx -a ~/pi_backup.img
This will mount the image file to a loop device and add partition mappings, as well. Running lsblk shows:
NAME          MAJ:MIN RM   SIZE RO TYPE MOUNTPOINT
sda             8:0    0   128G  0 disk
├─sda1          8:1    0   250M  0 part /boot
├─sda2          8:2    0     1K  0 part
└─sda5          8:5    0 127.8G  0 part
├─root-swap 254:0    0     4G  0 lvm  [SWAP]
└─root-root 254:1    0 123.8G  0 lvm  /
sdb             8:16   0    80G  0 disk
├─sdb1          8:17   0     1K  0 part
└─sdb5          8:21   0    80G  0 part
sr0            11:0    1  1024M  0 rom
loop0           7:0    0  29.7G  0 loop
├─loop0p1     254:2    0    63M  0 part
└─loop0p2     254:3    0  29.7G  0 part
From this I one can see that the image file pi_backup.img is now mounted to loop0 with the first partition mapped to loop0p1 and the second partition to loop0p2.
To shrink the filesystem on the second partition I first have to check the filesystem with:
sudo e2fsck -f /dev/mapper/loop0p2
After that, I can now shrink the filesystem with:
sudo resize2fs -M /dev/mapper/loop0p2
After resize2fs is done it tells me:
Resizing the filesystem on /dev/mapper/loop0p2 to 1555124 (4k) blocks.
The filesystem on /dev/mapper/loop0p2 is now 1555124 (4k) blocks long.
That is, the filesystem is now 1555124 * 4k in size, that is 6220496k which in turn is about 6074MB or 5.93G.
Shrink the partition
Nex I want to shrink the partition to the size of the shrinked filesystem. For this, I first remove the mapping from
kpartx with:
sudo kpartx -d /dev/loop0
This removes the two partition mappings loop0p1 and loop0p2, but leaves the image available as loop0. Now I am able to
use the power of fdisk:
sudo fdisk /dev/loop0
Typing p shows me the current available partitions on loop0:
Units: sectors of 1 * 512 = 512 bytes
Sector size (logical/physical): 512 bytes / 512 bytes
I/O size (minimum/optimal): 512 bytes / 512 bytes
Disklabel type: dos
Disk identifier: 0x7b919980

Device       Boot  Start      End  Sectors  Size Id Type
/dev/loop0p1        8192   137215   129024   63M  c W95 FAT32 (LBA)
/dev/loop0p2      137216 62333951 62196736 29.7G 83 Linux
Now, the partition on /dev/loop0p2 is still 29.7G big. To shrink it, I’ll have to delete it and create a new partition.
So, I type d to delete the second partition (default offered). From the list I got with p I know where the first
partition ended and the second started. With this in mind I am able to create a new partition with a smaller size. For
this, I type n followd by p and accept the default for the partition number (default 2).
The first sector should be the same as before, that is 137216. The last sector is an estimate. From the math I did after
shrinking I know that I need about 6G. To be on the save side, I add 1G more. Just to be sure! So, for the last sector
wanted by fdisk I enter +7G.
Now, p shows me:
Device       Boot  Start      End  Sectors Size Id Type
/dev/loop0p1        8192   137215   129024  63M  c W95 FAT32 (LBA)
/dev/loop0p2      137216 14817279 14680064   7G 83 Linux
I am happy with this, so I type w and hit ENTER. Done!
The final step is to remove the loop device:
losetup -d /dev/loop0
Checkpoint
At this point everything should look like before we started. If losetup did not work, try
dmsetup remove /dev/loop0 and if that does not work, try the ultimate weapon: dmsetup remove_all. The last one should
remove all loop devices that you had.
To check that everything worked as expected, I will use kpartx -a ~/pi_backup.img one more time and show the result
with lsblk:
NAME          MAJ:MIN RM   SIZE RO TYPE MOUNTPOINT
sda             8:0    0   128G  0 disk
├─sda1          8:1    0   250M  0 part /boot
├─sda2          8:2    0     1K  0 part
└─sda5          8:5    0 127.8G  0 part
  ├─root-swap 254:0    0     4G  0 lvm  [SWAP]
  └─root-root 254:1    0 123.8G  0 lvm  /
sdb             8:16   0    80G  0 disk
├─sdb1          8:17   0     1K  0 part
└─sdb5          8:21   0    80G  0 part
sr0            11:0    1  1024M  0 rom
loop0           7:0    0  29.7G  0 loop
├─loop0p1     254:2    0    63M  0 part
└─loop0p2     254:3    0     7G  0 part
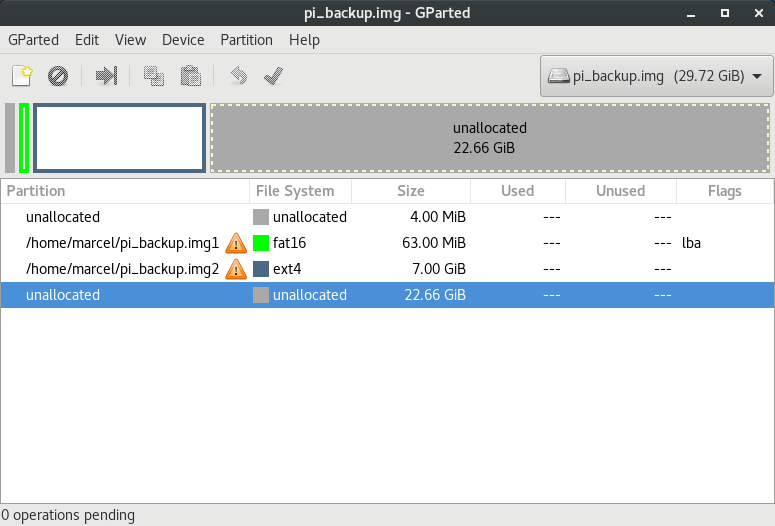
Again, to visualize the current state I present another screen shot.

Great! The second partition is now 7G, instead of 29.7G. So, let’s remove the mapping again and finally shrink the image file to get rid of the unused space!
sudo kpartx -d /dev/loop0
sudo losetup -d /dev/loop0
Shrinking the image file
Knowing the Image is about 30G in size with one partition of 63M and another of 7G, I estimate that keeping 8G in total should be save. So, I cut off 22G:
truncate -s -22G ~/pi_backup.img
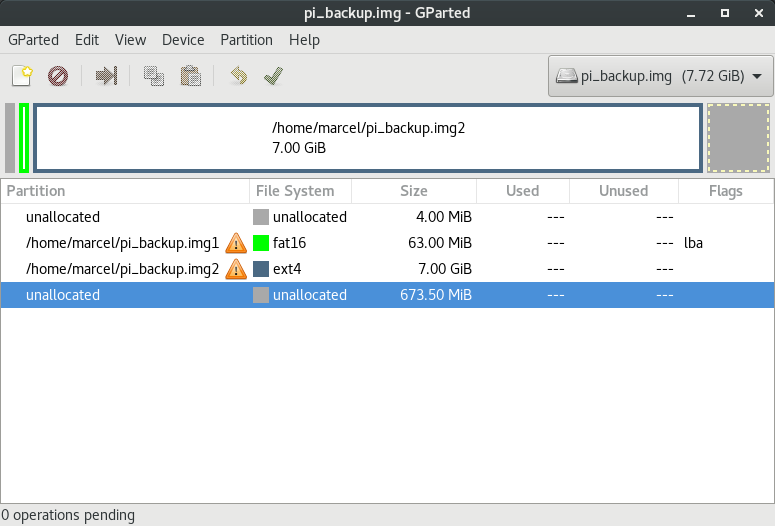
Let’s check again what the final image file now looks like in GParted.

Move the image to a new SD card
The final step is like the first step, just the other way around. That is, I plug in my USB stick with the new 16G SD card and call:
sudo dd status=progress if=~/pi_backup.img of=/dev/sdc
After dd finished, I have a cloned SD card that I can now insert into my second Pi. The rest is like one would do with
any of the initial Pi images: After a first boot expand the filesystem with raspi-config to use all the space available
on the SD card.
